Monday, 27 June 2011

Getting back to some ATC trading

Seems to have been ages since I last made an ATC trade; the group that I did most of my trading in on Flickr seems to have come to a full stop. A little sad but I guess that is the way of the world, people move on and make new interests or join other groups - or the ubiquitous FACEBOOK, as it marches forward. Personally I do have a F/B presence but I don't really spend a lot of time on their, and it seems that I am using it mainly to promote my Squidoo web-pages.

Anyway, tonight I have posted an ATC in the PDA challenge / swap. This month is the 21st challenge and to celebrate I have chosen an "open theme". We have some great cards already - looks like it may be a good month. My entry is:-


The images are mainly from collage sheets by Kim Newberg and the text is from a link on my Squidoo page, Making Artist Trading Cards. You can see other cards entered into this and past challenges in the offical PDA ATC blog.

Here's hoping that this is the first of many to come in the future, I would really hate to not be trading. It has opened a whole world of alternative art for me and has made me many friends and contacts around the world via the internet.

Tuesday, 21 June 2011

An ATC Triptych

Made this mixed media collage piece to illustrate a page on "Ultra ATC's". This is a term I first came across in Berni Berlin's ATC workshop book, gives an artist a little more room for creativity, don't you think. I have never been one for adding lots of frippery, tending to keep my stuff simplistic and to have each item adding to the story. Sometimes I think that I ought to change but it's just "doing what comes naturally" there is a larger version on my Flickr photostream.

What do you think?


The main images are from a collage sheet, called daunting darlings from Kim Newberg and the backgrounds are basically black and white images of the eiffel tower. My history was never much good! The other text was simply found serendipitously ( is that a real word?) in my stash or from magazines. The coloured borders at the top of each atc are downloaded from the Flickr free images group, my apologies to the artist whose name I have not got at my fingertips.

I guess many of you died in the wool ATC'ers will already have this book, but if you haven't why not? It has become something of a standard text for many artists. I am continually dipping back into it for inspiration and new ideas.

I guess that one of the issues for me is that I get into a rut with techniques. I make something, it works, and then I make something else along the same lines. A book like this helps to remind me that there are many ways of skinning a cat. (Whoops, is this a politically correct thing to say these days.)


Along thse lines, I have recenly "unearthed" some early paintings of mine whilst searching my loft/storage area for some frames for a project I am starting. The first is a small oil painting of an apple - talk about simplistic! The second is a very early pastel. Judging by the blue of the sky, this was before I had aquired a complete set of colours. These days I would definitely have toned down the blue.


In fact to be honest, these days I would probably have laid down an underpainting with an orange sky before layering with the sky colours that I wanted to be seen. Then when leaving small patches of the underpainting showing thru the top coat, the complementary colour adds a real zing. In the same way, I would have put a red undercoat over the grassed areas.

I started using this technique when painting abstracts but found that it worked equally well with other types and gendres od paintings. But this is something I should be discussing on another blog.

Saturday, 18 June 2011

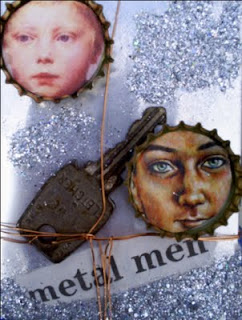
An ATC created using mainly metal components.

So we are all used to making artist trading cards from card and paper with embellishments and charms which can range from metal to plastic, fibre to textile, clay to ... well, you name it! Almost anything and everything can be utilised to serve our artistic whims.

However, in this post I am going to show a card which I have made specifically from mainly metal components. I came across an article in an ezine by Lisa Vollrath, "The Monthly Muse" which showed how to use soft drink cans to obtain metal sheet. Of course I have used a beer can, but the principle is just the same. They are mostly made from aluminium these days but there should be no problem from an older steel type, although it might be slightly harder to cut. Pierce the can and use a normal pair of scissors to cut around the top and bottom of the can and then slit vertically to provide a small sheet of thin metal. It is not particularly dangerous and probably no more likely to cut your fingers than a new sheet of paper. It will however have a coating on both sides so this must be taken into account when assessing what to use it for.

I was making a card for a challenge on Kim Newberg's PDA site  and the theme was to use a word from a newspaper headline. I cheated and used two. It was a story about scrap metal dealers and the phrase, " Metal Men" caught my attention, hence the idea for this card.

I actually wrapped the metal sheet around an atc card former, I thought this would add some stability to the creation. I used a rubber solution, which you apply to both sides to be adhered, and leave to get tacky before positioning and fixing. This gives an instant bond, no need to wait for glue to dry. So my background was easily sorted. I was at first going to colour it with alcohol inks but as I formed a design idea, I decided to leave it as it was. I had of course washed the last remnants of beer from the sheet before starting.

I tore the phrase from the newspaper, and started to search for ideas. I soon decided to use (beer) bottle tops to frame a couple of images. To make these, I cut a card backing for the images and glued the images down to this card. To raise the images further in the tops, I used a double-sided foam adhesive tape.

I had a slightly rusty key which seemed ideal for this project, and some copper-coloured wire. After playing with the positioning, I used the rubber-based glue to bond the main elements to the backing, again letting the glue become tacky before fixing into postion. I wrapped the wire around the card, and through the key to best effect.

To complete the card, I decided to add a little texture with some silver glitter. I used a liquid glue and tipped the glitter on to the glue whilst it was still wet. The outcome was, The Metal Men:-


I like this one, as with all my mixed media collages it seems to be quite a simple design but should I be worried. After all wasn't it Da Vinci who said, "Simplicity is the ultimate sophistication".

Tuesday, 14 June 2011

My new Zazzle store and blog

I have started selling products on Zazzle, a print on demand company, with images of my art. Paintings and collages. To promote the store and write about my experiences on Zazzle I have also started a new blog, Artyfax on Zazzle.

Please pay a visit to either, and comments would be greatly appreciated especially if letting me know what you think about the products. So far I have two stores. The first is the one I started with and I have been learning. To put some of this learning into effect I will be opening more "niche" stores to make it easier for the customers to find what they want - hopefully.

The second store is ArtyfaxCards - using my art and photographic images with my strange brand of humour to make unique and individual greeting cards and postcards.

Saturday, 11 June 2011

A craft doll from my chequered past

I have been ruminating (yes it is legal) on my artwork from the past few years. One of the reasons is the desire to do more three dimensional art work, and I have realised that to meet various challenges that I have made more 3-D stuff than I realised. A doll (although male), a small assemblage from a tin and using mainly paper images were the first two items which I tried in this gendre. The doll was made for a challenge on a private group on Yahoo ( my first group on the internet), which is now unused since most of the members migrated to Flickr. It was my first attempt at anything other than a simple collage, and at that time I don't  think that I even used 3-D embellishments, etc. So it was a big step toward becoming a mixed media artist. Not a very inspiring piece but as it was the first, I still have it hanging on my studio (?) wall. Here it is:-


It was made according to instructions given in an article I came across on-line. I seem to remember that I declined to enter into the on-going challenge but when I found this I made it just to show the ladies in the group that I could make a doll. I was the only male and it seems that the ratio has been very similar ever since, whatever group I find myself in. The face by the way is an image from a magazine stuck to a wine cork.

Well time to decide what my next project is going to be, and of course i will post it here what ever it looks like, success or failure.

Sunday, 5 June 2011

The Front of the Assemblage from my last post


Just thought that I should have posted the image of the front of the box in my last post, so as not to leave you wanting here it is:-


The tin box ( which originally contained a brace of whisky miniatures) was painted black with acrylic paint and then a gold metallic acryllic was wiped down across the front to achieve the desired look.

You can see this ( soon I hope ) and other art from the PDA design team on a new blog, check it out.

Wednesday, 1 June 2011

Assemblage for PDA Designer Challenge

OK a preview of the assemblage which I created from the bits and pieces which I showed in my last post.


I call it, Neffertiti's Trinkets and Treasures. I shall be posting a description and more images very soon.

This is a new challenge for me, I have been made a designer for PDA and every month we are given a collage sheet from which we have to create a piece of art.


I must have posted previously about a new interest for me, I found a book by Michael De Meng and this has proved to be a fabulous inspiration. Read it if you can! I do not think I will be making art creations like his to start with but I will be learning as I create.